
Having a reliable and secure server infrastructure is crucial for businesses of all sizes. Microsoft’s latest offering, Windows Server 2022, brings a host of new features and improvements to help organizations meet their evolving needs. This article will guide you through the process of deploying Windows Server 2022, from installation to initial configuration, ensuring that your server is ready to tackle the challenges of modern computing.
New Features and Improvements in Windows Server 2022
Windows Server 2022 builds upon the solid foundation of its predecessor, introducing several enhancements to bolster security, facilitate hybrid cloud integration, and provide a flexible application platform. One of the most notable additions is the advanced multi-layer security, which includes a Secured-core server and Secured connectivity features. These help protect your server against sophisticated threats across the hardware, firmware, and virtualization layers.
Moreover, Windows Server 2022 offers seamless hybrid capabilities through Azure integration, enabling you to leverage the power of the cloud while maintaining on-premises control. The flexible and scalable application platform supports containers, Kubernetes, and other modern development tools, making it easier to deploy and manage applications across diverse environments.
System Requirements for Windows Server 2022 Installation
Before embarking on the installation journey, it’s essential to ensure that your hardware meets the minimum requirements for Windows Server 2022. You’ll need a 1.4 GHz x86-64 processor, at least 2 GB of RAM, and 32 GB of free disk space. Additionally, your system should have a UEFI 2.3.1c-based firmware that supports Secure Boot and a Trusted Platform Module (TPM) for enhanced security features.
Step-by-Step Installation Guide
To begin the installation process, you’ll need to download the Windows Server 2022 ISO from the official Microsoft website. Once you have the ISO, you can create a bootable USB drive or mount it on a virtual machine.
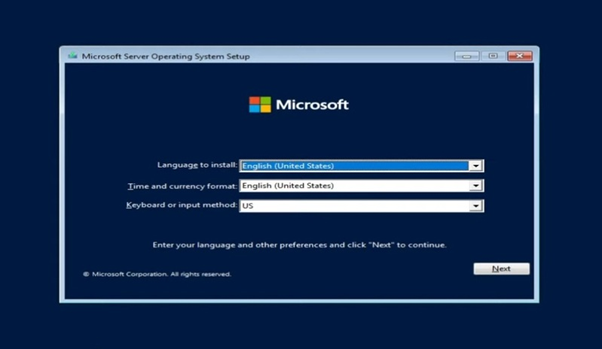
The installation wizard will guide you through the process, prompting you to select your language, time and currency format, and keyboard input method. After accepting the license terms, choose the appropriate installation type — either “Custom” for a clean install or “Upgrade” if you’re upgrading from a previous version of Windows Server.
Next, select the target partition for the installation and let the wizard complete the process. The system will reboot several times during the installation, and you’ll be asked to set an administrator password.
Configuring the Network on Windows Server 2022
With the installation complete, the next crucial step is configuring the network settings. For Server Core installations, you can use the SConfig utility to access the network configuration menu. Select the appropriate network adapter and configure the IP addresses and gateway settings according to your network requirements.

If you opted for the Desktop Experience installation, you can configure the network settings through the familiar GUI. Open the Control Panel, navigate to Network and Internet > Network Connections, and right-click on the desired network adapter to access its properties.
Installing the Latest Windows Server Updates
To ensure that your Windows Server 2022 installation is secure and up-to-date, it’s important to install the latest updates and patches. Microsoft regularly releases updates that address security vulnerabilities, fix bugs, and introduce new features.
You can use the built-in Windows Update tool to check for and install updates automatically. Simply open the Settings app, go to Update & Security, and click on the “Check for updates” button. The system will download and install the available updates, prompting you to reboot if necessary.
Backing Up Windows Server 2022
Regular backups are essential to protect your server data from hardware failures, cyberattacks, and other disasters. Windows Server 2022 includes built-in backup tools, such as Windows Server Backup, which allows you to create and manage backup tasks.
Additionally, you can use third-party backup solutions like MiniTool ShadowMaker for more advanced features and flexibility. These tools enable you to schedule automatic backups, choose specific files and folders to back up and store the backups on external drives or cloud storage.
Additional Configuration and Setup
With the basic installation and network configuration complete, you can proceed to set up the various server roles and features required for your specific use case. Windows Server 2022 provides a wide range of roles, including Active Directory, DNS, DHCP, File Services, and more.
You can use the Server Manager tool or PowerShell to install and configure these roles. It’s also important to implement security best practices, such as setting up firewalls, configuring access controls, and enabling encryption for sensitive data.
Troubleshooting Common Issues
Despite your best efforts, you may encounter issues during the installation or configuration process. Some common problems include:
- Installation errors due to incompatible hardware or corrupt installation media.
- Network configuration issues resulting in a lack of connectivity.
- Update failures caused by network problems or insufficient disk space.
- Backup failures due to incorrect permissions or storage issues.
To troubleshoot these issues, consult the official Microsoft documentation, forums, and support channels. Often, a simple Google search can also yield helpful solutions from the wider Windows Server community.
Conclusion
Deploying Windows Server 2022 may seem daunting at first, but with the right guidance and preparation, you can have your server up and running in no time. By following the steps outlined in this article — from choosing the appropriate installation option to configuring the network and implementing security best practices — you’ll lay a solid foundation for your server infrastructure.
Raghav is a talented content writer with a passion to create informative and interesting articles. With a degree in English Literature, Raghav possesses an inquisitive mind and a thirst for learning. Raghav is a fact enthusiast who loves to unearth fascinating facts from a wide range of subjects. He firmly believes that learning is a lifelong journey and he is constantly seeking opportunities to increase his knowledge and discover new facts. So make sure to check out Raghav’s work for a wonderful reading.